Showing posts with label pattern drafting. Show all posts

Saturday, 12 February 2011

Men's Shirt Sew-Along 11 -- A new collar for Negroni!


The Negroni men's shirt pattern is lovely.  I've seen some wonderful early versions in our Flickr group and it's great fun to see how different the results are depending on fabric choice.

Many people wanted to know how to convert Negroni, which has a camp collar, into a traditional dress shirt, like the one pictured above.  Today and tomorrow I'm going to show you how.

Our goals for today are:

1.  Draft new facing for right shirt front (button side)

2. Draft button placket for left shirt front (buttonhole side)

Let's take another look at the Negroni shirt.
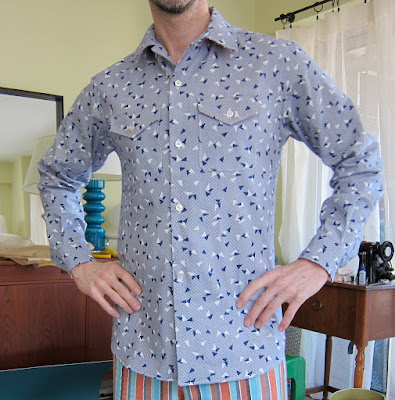


Now here's a more traditional men's dress shirt.


The dress shirt has a front button placket on the left side (the side with the buttonholes on a men's shirt), a folded-under facing on the right side (the side with the buttons), a collar stand and a collar.  And no button loop.

The Negroni shirt, like many camp-collared shirts, has inner facings and no button plackets.  The convertible collar is one piece only.   As those of us who have made the Negroni pattern know, the inner facings are shaped with extensions along the neckline to help cover the raw edges of the camp collar (the center part of the collar is enclosed by the inner and outer back yoke).  Remember these?


To turn the Negroni pattern into a traditional dress shirt, nothing needs to altered on the original pattern pieces themselves.  We'll be making four simple substitutions: a facing, a button placket, a collar stand, and a collar.

1.  If you take a look at a men's dress shirt, you'll notice that nearly all have a button placket on the front left side.  The buttonholes are arranged down the center front of the placket.  This makes perfect sense: we want our buttonholes (and buttons) to create a vertical center line.   Since the buttonhole placket will cover the right side of the shirt (where the buttons are attached), we're going to create a simple rectangular facing for that (right) side. 

On some dress shirt patterns, there is a separate right and left pattern piece, and often the right front includes the facing, as below:


Please notice that on this McCall's shirt pattern, the center front line is where the buttons are located.  The edge of the right front will be 5/8" from that.  The remaining piece, measuring approximately 1 1/8", gets folded under.  The raw edge is generally finished with a 1/8" seam hem, though this can be wider on some patterns.  Regardless, since this is a facing, it will all end up on the inside of the shirt.   Sometimes this is stitched down to the shirt front itself, as below, and sometimes it is left loose.


Rather than redraft the Negroni pattern, we are simply going to add an attached facing to the right front.  This will be one long rectangle (with no shaped extension).   The top can have the same (slight) curve as the shirt front, but it's all going to end up as seam allowance anyway.  (I cut my facing a bit longer and just trim it against the shirt front neck curve.)

We start with a 5/8" seam allowance.  Let's have the placket centered directly under the button line, which is an additional 5/8" from the front edge.  So we'll be adding 10/8, or 1 1/4".  Next, to finish the facing's raw edge, let's add an additional 1/4" for a hem.  So the total width of the facing will be 5/8 + 10/8 + 2/8 = 17/8 or 2 1/8 ".

Are you with me?  I cut my placket along the selvage, so I didn't need that additional 1/4".  My facing measures 2".   Remember, this is just a facing; it won't be visible.  I have decided not to use interfacing on either placket or facing, btw.


The length of the facing should match the length of the shirt front.  It will be folded into the hem along with your shirt front.

We'll attach this facing, with it's outer edge finished, RIGHT SIDES TOGETHER at 5/8" and turn it under.


2.  Now we need to draft the left front button placket.  Here's what the left front of my McCall's shirt pattern looks like.   The placket piece is lined up next to it.
 

Like the right front, we're starting with a 5/8" seam allowance.  Again, from the front edge there's 5/8" distance to the center front. 

Traditionally, the shirt front button placket is drafted a bit wider than the left front facing.  We'll start with the 5/8" seam allowance, add 10/8 (or 1 1/4") so that the button holes are center front, and add 5/8", which will be turned under and topstitched down on the shirt front.  So our placket pattern piece will be 20/8, or 2 1/2".  We'll end up with a finished placket that is 1 1/2" wide and topstitched on either side at 1/4".  


The length of the left front placket should be the same as the length of the shirt front + 1/8" (so you can fold it under the hem fold since it's outside the shirt front.)  The top can have the same bit of curve as the left shirt front, just to be neat -- it will end up in the seam allowance when you attach the collar stand/collar.

We'll be attaching the front placket differently than we attached the right front facing.  Instead of stitching with right sides together and folding the facing under, we'll be stitching with RIGHT SIDE OF PLACKET TO WRONG SIDE OF SHIRT FRONT and folding over (over the front right side).

Here's my left front placket already attached to my shirt front (right side up).  It's hard to tell since right and wrong sides are identical, but I've stitched it right side of placket to wrong side of shirt, and folded it out and over, on the seam line.


Here's my placket, topstitched at 1/4" on either side.  REMEMBER: the edge that's being lifted by my finger is folded under at 5/8" and topstitched at 1/4".


The Negroni center front is 5/8" from the edge.  The placket should have the same center line.

Your assignment today is to look at some men's RTW shirts and see how the fronts are finished.  How wide are the plackets?  Sometimes they're drafted a little wider than this, sometimes narrower.  My Brooks Brothers shirt's finished placket is 1 3/8" wide; the center front is 3/4" from the edge on right and left sides.   The buttonholes are still dead center, and there's equal width on either side to the edge of the placket.

Tune in tomorrow as we draft a collar stand and collar -- a technique you can use for any shirt pattern whatsoever.

Please leave questions or comments here or in our Flickr group.

Have a great day, everybody!

Friday, 26 November 2010

Straight Skirt for Mom: a Holiday Drama


Mothers.  What can you say?

I don't even remember the genesis of this skirt project exactly.  Did I offer to make it for my Mom (Sonia to you) or did she ask first?  Who knows and at this point who cares?  Somehow it was at the top of my sewing queue; I knew I had to have it completed by early December so my mother could wear it to a friend's grandson's bar mitzvah, to which (she claimed) she absolutely positively could not wear pants.

About a week ago we'd bought the fabric -- a nice quality black poly crepe and matching acetate lining -- and yesterday I dedicated most of the morning and early afternoon to making a muslin for my mother to try on when she came down to our apartment later in the day, from where we'd cab it to relatives in the East Village who host Thanksgiving every year.

I drafted the skirt myself using Dorothy Moore's Pattern Drafting and Dressmaking book.  I know some of you own this book and some of you don't think it's so great, but I like it and find it easy to work with.  I like that you only add the seam allowances when you cut your fabric, like a Burda pattern.


I used a pink cotton-poly sheet for my muslin, and it all came together easily.


It has four darts in front, four darts in back, and a kick pleat.


Still without waistband or side zip...


Around 3:15 pm, my Mom arrived.  She tried on the muslin (top photo) and it looked good.  No major changes needed.  Then she tells me that the bar mitzvah is Saturday -- this Saturday.  She must have told me earlier and like so many things she says, I just tuned it out.

She was spending the night and leaving the next morning (i.e., today).  So in the hour before we had to leave for our holiday dinner, I hustled, cutting the black crepe and getting as far along in the project as I could.  Needless to say I attended Thanksgiving unshaven.

By the time we left, it looked like this:


Obviously some pressing of darts is needed (and it's still in two pieces), but not bad for a rushed hour's work.  I'd forgotten how shifty poly crepe is; it's a much more difficult fabric to sew with than a cotton-poly sheet.  It's also hard to mark for things like darts.  I used tailor's chalk and did the best I could.  Only after I'd drawn the darts on the front panel did I realize that the fabric has a right and wrong side and I'd drawn the darts on the right (which is to say, wrong) side.  So I had to wipe them off and draw them again.

I hate hasty sewing. 

But it would all prove unnecessary, friends!

Long story short: it became increasingly clear throughout the evening that my mother didn't want to go to this event in the first place but didn't know how to get out of it.  Her knee has been bothering her more of late and she's going to have to have a knee replacement, but she didn't want to offend a close friend.  Michael and I convinced her to do what she needed to do for herself and that, given that the event was her friend's grandson's bar mitzvah and she didn't even know the grandson, she wasn't going to ruin anybody's afternoon by not showing up.

Using her best phoning-in-sick-to-work voice (odd, since the excuse was a bum knee and not bronchitis, but an old habit) she did what she had to do and freed herself from an obligation. 

So after I'd hustled with the poly crepe and rescheduled my mother's ride home today to give me more time to complete the skirt, lining, zipper, etc., I now no longer have to make the skirt by Saturday.  And I don't intend to.

An awful lot of drama for less than a yard of poly crepe, no?

Readers, two questions:

1) Do you think women have a harder time extricating themselves from unwanted obligations than men?  I mean, Michael and I were both like, If you don't want to go, don't go!  This seemed like a foreign concept to her. (Then again, here I was, stuck making a skirt for my mother...) 

2) Would I have had an easier time cutting my fabric and sewing my darts if I'd used wool crepe instead of poly?  I'd actually looked at black wool crepe in the store, but it was thin and cheap looking.

That's it -- easy.

Hope those celebrating holidays are enjoying them and didn't overeat last night.  As for the rest of you: do you ever sew for your parents?  Is it a pleasure, a pain, or a little of both?

Have a great day, everybody!

Monday, 11 October 2010

Sick-Week Synopsis


Readers, I'm stunned.   Yesterday I attempted to plant the seed of prosperity in your lives with some timeless New Age wisdom and you responded with a shopping list worthy of a wedding registry at Bed, Bath & Beyond.

To think that your great grandmothers treadled their calves raw with no electricity and just a rudimentary straight stitch and probably clothed the entire family.  There were no self-healing cutting mats, no sergers, no embroidery machines.   And not to make an example of Nessa, no Sunbeam Mixmasters. 

And grateful great granny probably shared her sewing room with eight children and a cow!  Seriously, though, I predict that at least half of you will get what you wished for by year's end.  The other half, well, it doesn't look good.

And on the subject of modern miracles, the universe has restored me to health with just a little residual morning phlegm!

Now lest you think I spent last week just blogging in bed beside a box of bon bons, here's a quick wrap up of my activities:

1) I decided to give pattern drafting another try, this time using Donald McCunn's How to Make Sewing Patterns.


As he suggests, I broke the book binding and put the entire contents in a three-ring binder.  With Michael's help I took my measurements and then I got to work on the basic men's bodice.


I chose this book because, unlike Dorothy Moore's pattern drafting book, McCunn directly addresses the male body and mens clothes.  But there's a great deal of confusion about waistlines!

In one section, addressed to both men and women, McCunn states clearly that the waistline is to be taken by tying a string around the narrowest part of one's midsection.  He then explains that actually, ...men's pants are almost never designed to fit at the natural waist.  They are 3-4 inches lower.  

What he doesn't say clearly is if a man taking his measurements should use his true waistline or not.

In his description (on p. 19) of the CENTER FRONT/WAIST TO SHOULDER measurement he states This measurement is diagonally from the intersection of the Center Front and Waist (the navel) to the the Shoulder Point.

Now I'm confused.  Are we measuring from the true waist (the narrow point around which we've tied a string, some point 3-4" lower where our pants generally sit, or the navel?

Maybe I just wasn't thinking clearly in my health-compromised state.

Anyway, I drafted a bodice.  And then I ran out of steam.


2) Feeling stronger, on Saturday I met up with MBP reader and self-described lurker, Jo of Vancouver, for a visit to the latest FIT Museum exhibit and a dig through the Chelsea Flea Market.  That's Jo on the right.


Parenthetically, readers, are all Canadians endlessly polite?  I have never had so many doors opened for me as I did that day. I felt like the Queen. (No cracks)

More about the exhibit, "Japan Fashion Today" later in the week but in a word: Spectacular.

3) Yesterday, on my own, I returned to the flea market, and made a completely unplanned purchase.  Notice anything different about me, readers, beside the fact that I haven't shaved in weeks?


Here's a hint:


Yes, boots!  Dead stock (i.e., vintage but never worn) cowboy boots from the Seventies that fit great and feel super-comfy.  Not bad for $40 -- less than half what I could have spent on a prized vintage sewing machine I didn't need and thanks to The Secret, knew it.


This is the sewing machine in question, by the way, an Elna Lotus.  Johanna, if you want her, she's yours (sob!).  Craigslist, Brooklyn.


Readers, today I return to the cranberry corduroy jacket.  If Gertie can tailor a jacket and live to tell about it, so can I!

But enough about me.  What's up in your neck of the planet?

P.S. -- I need to wear longer pants with those boots, right?  Do you think they are too Glen Campbell?  Naomi Campbell?   Be honest.

Wardrobe guidance, please!

Monday, 19 July 2010

My Fair Lady Monday + NO GOALS


Whoops, wrong pic.  Sorry, Julie!


Dear readers, I was at the 39th Street flea market yesterday with my friend Jamie, and look what she bought me!  It's an early Sixties straight stitcher -- my very first White sewing machine -- model 763, also known as the "Fair Lady."  (Still searching for the "Man of La Mancha.")


I'll be honest with you: nothing charms me more than gendered appliances.  I mean sure, this little (well, 25 lbs, easy) machine has fluid lines and cute curves, but I have inspected it top to bottom and while I didn't find a penis, neither did I find anything that screamed "Fair Lady," if you know what I mean.  Be that as it may, I love my new straight stitcher; I don't really zigzag -- the talk of the online sewing community.

This machine is so pristine I doubt she was ever used; the accessory box still has the needles she came with as well as an unopened tube of sewing machine oil.  No dust, no lint.

And speaking of dust and lint, she totally reminds me of the vintage Electrolux vacuum cleaner we had growing up. 


I have a whole album full of my "Fair Lady" pics here including some shots that are strictly gynecological so beware.

Do you call most of your home appliances "she" or "he?"  I tried to refer to my Singer 15-91 as "he" for the longest time but it soon became obvious that I was working against nature and I have resigned myself to my Singer's strong female identification and stopped making her wear boys clothes.  Sigh.

But that's not all I picked up at the flea market yesterday -- look!


Five more pounds of patternmaking porn!  The price was so right on this used textbook ($15)  I couldn't resist.  I've read that the Third Edition of this Helen Joseph-Armstrong classic is not the best (the Fifth Edition is the current one), but whatever; how bad could it be?  Are you familiar with it?  Does it prop up any windows or doors at your house?

Friends, in my new summer, post-vacation orientation, I'm not up to nagging you -- or me -- today.  I'm going to try to keep it loose this week as I settle back into the swing of things.

I'm still only on page 430 out of 826 in my Etsy dress pattern treasure hunt, so there's much work to be done.  I also want to get better acquainted with my White 763.  Maybe I'll make a movie!

I know how much you crave structure in your lives and where else are you going to get it if not here, but what can I say?  It's July.

I still want to hear what you've been sewing, and there's that appliance question...

So who's Canadian out there?

I'm all ears!

Friday, 25 June 2010

Baby's got back and mild scoliosis


Readers, what idiot said:

That's the beauty of drafting: you're using your own body's measurements, so provided you can handle a little math and draw a straight and curved line (and there are a zillion aids to help you), things are going to fit.  You don't have to waste time with endless pattern adjustments?

Nevermind.

I spent much too much time yesterday working on fitting my self-drafted top pattern.  Now I know I don't have a bulging bosom, crooked clavicle, XXXL love handles, or a hunch, but I DO have my deformities and they are heck to deal with.

How I used to wonder (with some smugness, I'll admit) at the endless fit obsessions of various blogger friends, struggling with their swaybacks, dowager humps, and assorted bumps and bulges.  Oh, but karma stings!

Granted, unless I'm drafting a skin-tight jumpsuit -- and I will be -- there can be some fullness in men's tops.  Even a well-fitted men's formal shirt is likely to have more ease than, say, a 1950's wiggle dress women's bodice meant to be worn with a bullet bra and girdle.

But as anyone who's ever gotten deeply into fitting knows, once you get started, all you want to see is SMOOTH: no fullness, no pulling, no wrinkles.

I want the equivalent of my body covered in molten latex.  Or a good face lift. 

So yesterday I measured.  I trimmed.  I widened darts.  I narrowed darts.  I lengthened darts.  I shortened darts.  I did everything but throw darts which if I had, would have been at a photo of Dorothy Moore.


The problem, dear readers, is that while in my fantasies I look like this...


In reality, I look like this:


If there's one part of my body I'm not keen about, it's my forward-sloping shoulders and rounded back.  OK that's two parts, but you get the idea.  It makes fitting my back a challenge, IF I'm going to get really obsessive about it.  A yoke should deal with some of the fullness at the armscye (see top photo). I lowered the shoulder line twice and even tried darts, with mixed success.  Or do I need to lengthen the back?  You'd think I didn't own half a dozen books on fit.  

Maybe I'll just wear stretch knits from now on.

Anyway, that's where things stand, or rather, slouch.  David Coffin doesn't even advocate drafting a men's sloper from scratch but rather starting with a decent-fitting shirt pattern and making small adjustments from there.   I'm hoping this investment in fitting will pay off somewhere down the road. The question is when, and where will that road be -- Auckland?

So there, I've been chastened -- smug no more.

More coffee please!