Showing posts with label works in progress. Show all posts

Sunday, 20 November 2011

1944 Butterick Topper UPDATE!


Readers, it's time to return to the 1944 topper project, Butterick 2969.  And I have good news to report.  Though this coat hasn't been without its challenges, I'm very happy with it so far.

Whether it's on account of the texture of the fabric -- a well-worn vintage wool blanket -- or the dusty rose color, this is perhaps the most photogenic garment I've ever sewn.  Not that it's not attractive in real life, mind you, but it glows on camera.  It's the Ava Gardner of outerwear!


The biggest challenge has been the wool itself, which is closer to mohair than melton.  It's loosely woven and moderately stretchy.  You can press it -- carefully -- but you can also practically mold it into shape with your fingers, which means it is easily unmolded as well.

I've already attached facings and collar and turned them, and though I've trimmed and graded seam allowances extensively, facing seams retain a thickness I'll have to live with.  I can press the life out of them from the inside with a clapper, but at a certain point I risk damaging the fabric, even if I'm pressing over a point board.  I think the addition of topstitching along the front will make edges a bit more crisp.  I've been noticing a lot of wool coats lately, and looser weaves like mohair have softer lapel edges and wider topstitching. 

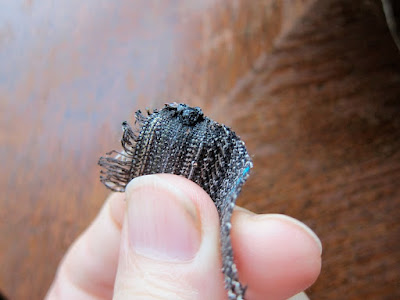
The fabric is very spongy.  I'm sure you're familiar with the type of blanket this is/was -- very fluffy, with a visible weave, more visible still on account of the age of the blanket.  Here's a close-up sample: you can see the yarn easily.


As I think I've mentioned, when steamed, the wool exudes the smell of an old vaudeville trunk.  Oh well.


I padstitched the hair canvas: not as big a deal as I'd feared.  I applied twill tape to the shoulder seams to strengthen them (and of course there's twill tape along the outer the edge of the front facings as well).


Front darts came out nicely.


The welt pocket was a headache and I wish the pattern had called for even deeper front pockets, but I managed.  I love the look of the topstitched diagonal seam and pocket.


The coat drapes beautifully, perhaps due to the softness of it.


Yesterday I attached the sleeves and maybe for the first time ever, my sleeves went on without a hiccup.  They eased in beautifully without any need to trim the sleeve cap.


How I'd like to show you the coat with sleeves, friends, but I want to keep it a surprise for now. I still have to line it, and I'm not sure what kind of lining I'm going to use just yet.  Plus I need mega shoulder pads, which I may or may not make myself.  I'm hoping to be able to photograph the whole ensemble -- Hollywood jumper and blouse and coat -- this coming week.  Fun!

I hope your sewing is going well, friends, and who just said What sewing?  Time to put your pedal to the metal -- or is it the other way around?

Happy Sunday, everybody!

Tuesday, 15 November 2011

Peter's 1944 Topper Project + COAT QUIZ!


Readers, having recently put the finishing touches on my 1944 misses' jumper -- which evidently stirs up unpleasant young Jane Eyre at Lowood charity school-type memories for a number of you -- I am now ready to get started on the most challenging and exciting of my three 1944 garments, the vintage Butterick topper.

As you may or may not know already, a topper is a woman's short, lightweight coat. This is a tailored garment, and there will be a good deal of hand sewing involved, horsehair interfacing, twill tape, etc.  The coat has welt pockets, but because they are located on a seam, there's none of that complicated pulling one layer through another.


There are also -- saints be praised -- no buttons, which means no bound buttonholes.  So I'm approaching this as sort of a practice tailoring exercise: just enough to be challenging, but not so much as to be discouraging.

You may recall that this is a refashioning project.  My fabric is a vintage wool blanket purchased at the Chelsea flea market.  I wouldn't be surprised if the blanket dated back to the 1940's itself.


While the seller claims to have had the blanket dry cleaned, it retains a -- how shall I put this? -- distinct aroma of basement, with some damp attic top notes; halfway between a moldy Featherweight carrying case and a washing machine full of old cardigans.  I think the damp weather may be contributing as well.  It wasn't apparent when I purchased it, but steaming seems to have restored its original smell.  I am hoping this will dissipate over time.

Butterick 2969 is an unprinted pattern and, right out of the envelope, the pieces resembled those wadded-up Kleenex one occasionally finds at the bottom of pants pockets after doing the laundry.  Thankfully, with a little careful dry ironing, I was able to bring the pattern back to life. 


I needed to bring the blanket back to life as well.  It measures 66" x 82" and is not without its cosmetic flaws, which I proceeded to outline in white chalk so I could cut around them.  Nothing major -- just some small tears, areas of excessive wear, light stains and discoloration.  


For topstitching, I'll be using beige cotton thread, which adds some much-needed freshness to the look of the fabric.  The wool is relatively easy to work with so far, though quite thick.


Friends, I had planned today to post a few similar vintage Forties women's coat patterns available on Etsy, and there are quite a few, like this one:


But as I was looking through coat patterns, I noticed a very odd trend.  I have decided to let you identify just what this trend is, in the form of a quiz.

1) What is wrong with distinctive about the following coat patterns?

2) What do these patterns suggest about a) fashion trends, b) home sewing, c) pattern companies, d) anything else you can think of?


Readers, I must start my day.  I hope you will take a moment to respond to today's quiz, as well as to share your best time-tested methods of removing dank smells from old wool.  You've been so helpful in the past with my old luggage (now sold, thankfully) and Featherweight case!

Have a sweet-scented day, everybody!

Tuesday, 8 November 2011

OMG, POLYESTER again!


Friends, I hate to share fabric-related unpleasantness so early in the week, but not everything in life can be silk and cashmere.  Or 100% wool.  I can't remember what the sales clerk at Nahir, at 242 West 39th St., told me about this fabric.  I think I knew it wasn't 100% wool.  I'm just not sure I knew it was 0% wool.

(Maybe this is why their feedback is, well, you decide.)

I was so desperate to make a choice of fabric for my vintage Hollywood jumper pattern, part of my 1944 Outfit Project, that I probably wasn't asking the right questions or listening to the answers.  The colors worked and it was within my (low) budget.


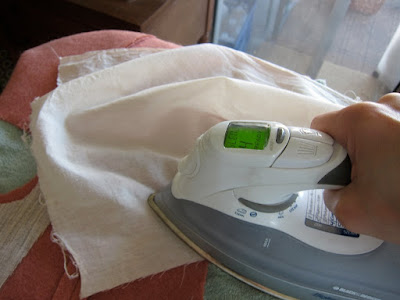
I noticed strange things about this fabric when I started to prep it.  It never wrinkled.  I also noticed, when I was ready to steam press/pre-shrink it, that it didn't have that distinctive wet wool smell.  In fact, it had no smell at all.  Did I mention that my beloved Black & Decker iron is starting to act up?  Its little computer brain seems to be clinging to life -- but more about that later, if at all.

I decided to do a burn test.  Lo and behold, the thing combusted like I'd soaked it in lighter fluid, and after I blew out the flames, formed a hard little bead.  This can only mean one thing: polyester or some other petroleum-based synthetic, like acrylic.

I still like my fabric and it's very soft, but it ain't a natural fiber.  Which is all well and good, I suppose, when you consider that the blouse it will be worn with is poly charmeuse.  I've given up on historical accuracy here.  But I must keep Cathy away from cigarettes, stove tops, and Bananas Foster -- no joke.


If you look at the selvage, you can see that this is a very loosely woven fabric, which means that it's shifty and ravely, not my favorite qualities, especially for a plaid.  Fortunately, it's a balanced plaid (same design side-to-side, symmetrical when folded) and hence a bit easier to work with and match.  Still, I've had challenges.  The skirt has a center pleat, formed by folding back the center of two front panels six inches.

I didn't do a very good job of measuring, I guess, and this is what I got:


Fortunately, when you look at the fabric from more than a foot's distance, all you really see are the horizontal stripes, which have a bit of red or rust in them.  Those match well.

Here's the front of the jumper:


The edges are finished with a narrow black cotton bias facing I cut myself.  I'll whipstitch the inside edges.


Front pockets are also lined with black cotton.


Rather than use my serger, I overcast raw edges, which feels gentler and works just as well.  


I've been using my trusty walking foot attachment on my Featherweight.  I don't know if it really helps all that much, but it definitely doesn't hurt.  Sewing plaid is stressful!


The skirt and jumper top are attached via a waistband, the inside of which is exposed (on the wrong side).  I'll probably interface or underline it.  The pattern calls for a snap closure on the left side of the skirt (I'll probably use a zipper) and hook-and-eyes on the waistband.  

I like the jumper so far and it feels very period, but it hasn't been fun to sew.  You can never relax with plaid, especially a loose, ravely, synthetic one like this.


Friends, that's all for today.  Oh -- my iron.  Last week I noticed it would turn itself on spontaneously when it was on auto off.  Now I'm noticing the electronic display messes up every so often.  It's frustrating, because mechanically the thing works fine, and it has performed flawlessly -- and constantly -- for the last two and a half years.  I have a heavy vintage iron I bought and haven't used yet, but that would require a lot more vigilance, and a spray bottle.

Is there anything worse than a failing iron?  You don't have to answer.

Now I must get back to my synthetic life...

Have a great day, everybody!

Friday, 4 November 2011

Poly, You Haven't Licked Me Yet!


Readers, I wasn't going to write about my 1944 blouse project again today, but I felt it my duty to share a few important truths about this synthetic fabric, perhaps to spare you some unnecessary headaches down the line.

Here goes:

1) Poly charmeuse will not ease.  It will, however, pucker like nobody's business (esp. when there's spandex in the weave).  I knew this going in, readers, but it's SO true. We've all encountered the sleeve cap situation where there's five or six inches of extra ease and you're like, Huh? I usually just chop the extra height off the top kind of intuitively. Well, with poly charmeuse, you don't want even an extra inch of ease because it ain't gonna ease.

My sleeve hole measured roughly 16 inches.  My sleeve cap measured more than 20!  I chopped, trying to retain the shape of the sleeve cap, which is not entirely symmetrical.


I had to deepen the armhole a bit as it was a little high, which widened the armhole a bit.


Believe it or not, there was still a little too much ease.


I got the sleeve on, and it doesn't look bad, but it was a headache.  If you stitch the sleeve on first with a basting stitch, the seam looks puckery, but you can't start out with a tiny stitch in case you have to rip the seam out.  Do you know what I'm talking about?

2) As I mentioned, my poly charmeuse has some stretch to it.  When you're stitching it you must not stretch the fabric under the sewing machine or it will look puckered when it's finished.  There will be the occasional appearance of puckering when the fabric stretches on the body -- I think this is very hard to avoid, particularly in an armscye.


3) The pattern called for two dart tucks at the front hem, giving the blouse a lovely hourglass shape.  Unfortunately, it also made it too fitted.


I had to take those tucks out and do it without damaging the fabric.  Eensy weensy stitches, too.  I managed it but is wasn't fun and I'll probably need glasses soon.  I'm not sure if this would have been easier or harder on real silk.  Any idea?

These wrinkles pressed out completely, thankfully.  I may add a very narrow dart tuck just to create the illusion of a slightly more nipped waist.


Overall, ripping seams in this rather pillowy charmeuse is a PITA and not for the faint of heart.

4. Poly charmeuse is thick and rather heavy.  The sleeves have ruffles on the cuffs.  The ruffle is made by folding a rectangle in half length-wise, right sides together, stitching the ends, and turning.  This is then gathered (!) and stitched to the cuff. The cuffs are then stitched to a gathered sleeve. 


The end result is OK, but lacks the crispness  and lightness you'd get with cotton or perhaps real silk.  The fabric is simply too thick for this to look elegant.  And you can't really press ruffles, can you?


The band collar came out very well.  But tied, it's hard to get the crisp bowtie effect you'd get with real silk, at least not without a lot of effort.  It's just too slippery. 


I'll have pics of the finished blouse this weekend.  Overall, I love it and it's very different from anything I've made before.  If I were to make this again, however, I think I'd do it in something crisper and probably a natural fiber.  It has certainly been an interesting challenge though!

Thoughts about poly charmeuse, pro and/or con? 

Happy Friday, everybody!