Friends, one of the alterations I need on nearly every commercial shirt pattern I use is a sloping shoulder adjustment. See that big diagonal crease running from my left shoulder to my left armhole? You'll see it on nearly all my shirts, on both sides.
Most men's shirt patterns are drafted for a squarer shoulder than mine. My shoulders are also slightly rounded forward.

In the first photo up top, I'm wearing one of my many versions of a favorite vintage pattern from the Seventies, Butterick 4712. I really wanted to adjust this pattern to fit better.

Now it's very difficult to address fit on oneself. I have had the privilege this month to work with the esteemed designer, teacher, writer, and fellow flea market devotee, Kenneth King. Kenneth recently contributed a series of articles specifically on fit for Threads in 2010.

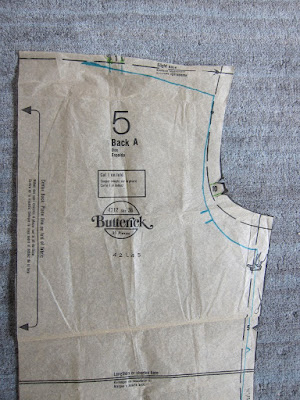
I wore my shirt to Kenneth's studio, which is just about a mile from my apartment, and brought my pattern along too. Kenneth immediately recognized my primary fit issue. He pinned out the deep diagonal crease on my shoulder to form an elongated, marquise diamond-shaped dart, whose width he carefully measured and transferred to the armhole. The shoulder is subsequently lowered the same amount.
This extra fabric becomes what Kenneth refers to as a "net loss." In other words, that extra fabric is being eliminated from the pattern.
The method he used is described in his article, "A New Approach to Fitting," from the February/March 2010 issue of Threads.
It's a wonderful article. Here's a quote you may find helpful:
"To start this process, make a muslin, put it on, and begin to pin out any fullness and unevenness to form a nice smooth silhouette. For garments that hang from the shoulders, adjust the muslin from the top down, as lower drag lines often disappear or diminish after the upper adjustments are made."

I want to share the alteration Kenneth made to my shirt pattern, one you can do yourselves, through Kenneth's method or others. These kind of sloping shoulder, rounded shoulder, narrow shoulder adjustments are described in every fitting book, including Fit For Real People, which I featured yesterday.
One note: FFRP suggests that any sloping shoulder adjustment made in back must also be made in front -- at least as I understand the photo on p. 160. Kenneth maintains that the adjustment should be made only where it's needed. To paraphrase: if you have diagonal creases (like mine) in back, address those. If you have diagonal creases in front, address those. If you have both, make the alteration in both front and back.
Remember: Shoulder and armhole are adjusted equally here.

Some detailed shots below. The size of the armhole doesn't change, nor does the yoke or front.


To compensate for the loss of length in back, he added additional length to the back piece so the back wouldn't be longer than the front.

My next goal is to make a new version of the shirt with the altered pattern and see what else -- if anything -- needs to be done. You may need to make a few muslins to work your fit issues (think art, not science). Even a master doesn't always get it on the first try, especially when multiple alterations are necessary, each one affecting the next.
As always, you can bring your specific fit questions to our increasingly colorful Flickr group, and we'll try to work them out.
Have a great day, everybody!
No comments:
Post a Comment