Today, friends, we add our collar to our transformed Negroni shirt!
For those just tuning in, we've spent the last two days transforming the camp collar Negroni shirt into a more traditional dress shirt by adding a front button placket and drafting a collar stand and collar. We also attached our inner and outer back yoke using the "burrito" method, which requires no topstitching.
Our goals for today are:
1. Cut our collar stand and collar to fit neckline
2. Interface outer collar and collar stand piece
3. Craft our collar and topstitch
4. Attach collar stand and collar to neckline
1. Now that we have our neckline complete, it's time to measure it. You'll want your collar stand to be the same length, plus 5/8" seam allowance on all sides.

You'll be cutting your collar stand and collar on the fold, perpendicular to the selvage. Remember that you've added a seam allowance to the stand, so take this into account when you cut. It's better to cut the stand a little longer than shorter: extra length will just end up in the seam allowance and be trimmed after stitching.
Now cut your collar, whose length was determined by marking where the collar meets the top of the collar stand and adding seam allowances.
REMINDER: Cut TWO collar stand and collar pieces: inner and outer, respectively.
Check and double check the measurements before you go any further (keep reading to see why this is critical).
2. After cutting, you'll probably want to interface the outer collar and collar stand. These will be the pieces that will face out (in the case of the collar stand) or face up (in the case of the collar). Lots of ways to do this as you know; pick a method you're comfortable with. I think I used a weft-weight woven fusible.

3. We make the collar itself just the way we did the Negroni collar, by stitching at 5/8" right sides together, trimming our seam allowance, turning with the aid of our point turner (if we have one), and then topstitching at 1/4". If you need a reminder, review this step.
Then stitch the top of the collar closed (at less than a 5/8" seam allowance).

4. Here's my method of attaching collar stand and collar to neckline, which I learned from an old Margaret Islander Industrial Shortcuts video, Shirts, Etc.
First, stitch the outer collar to the outer stand: -- OUTER SIDES OF STAND AND COLLAR FACING UP -- along the top at 5/8".

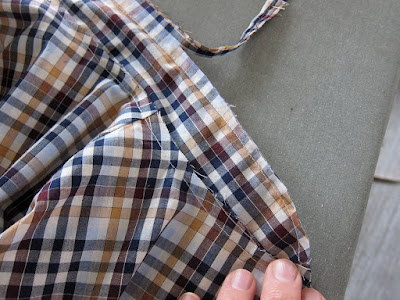
Next, stitch the bottom of the inner collar band (the piece without the intefacing) to the shirt neckline, making sure to match the center point on stand and shirt neckline, as well as the point we marked where stand meets facings. Basically, the stand has to be centered and even at both ends. When you flip the inner band up it looks like this (This is the inside of the shirt in the pic below.).

Now, take the outer stand/collar piece and attach it to the inner collar band, RIGHT SIDES TOGETHER. This technique is similar to the way we made our cuffs. You'll be stitching along the same seam as the seam holding outer stand and collar together. You're just adding the inner band (and attached shirt) to it.

You'll want to pay close attention to the point where collar stand and shirt front edge meet -- the shape should be the same on both sides. It will help to fold up the interfaced outer collar stand approximately 5/8" at the bottom edge, so that when you turn, the bottom corner will already be folded under.
You'll now want to trim the seam allowance, and turn this, just as you turned the cuff.


Now, just as with the cuff, we're going to fold the seam allowance under and edgestitch the outer collar stand seam to the shirt.


OK, so does my collar look a little too short for that band? It should -- I didn't double check my collar and collar stand measurements accurately when I cut them. Curses!

It was at this point I decided to make this into a short-sleeve shirt (since I'd wouldn't be able to button the top button as the collar was to short). I whipped through that pretty fast.
Voila!


Not perfect but good enough. I also made some changes (note the square bottom) I'll be discussing later this week when get into our discussion of fit. So this is another wearable muslin.
That's all for today, guys!
Questions or comments, just let me know, either here or in our Flickr group. (There are some great pics and discussions there so please pay a visit.)
Happy sewing, everybody -- and Happy Valentine's Day!
No comments:
Post a Comment